Client Portal
The Client Portal provides your clients with an easy-to-use web dashboard where they can view their staffing projects, submit staff requests and monitor real-time progress.
Contact our Customer Success team to activate the Client Portal add-on for your Workstaff account.
Setting up the add-on
After purchasing the Client Portal add-on, go to Settings > Addons to enable it on your account.
Then click Configure to manage the portal settings:
- Update the Organization name and the subdomain if needed
- Decide whether clients can order staff
- Select which skills clients can choose from among the skills already active on your Workstaff account
If you need to create new skills before configuring the portal, see Creating Skills.
Enabling access for a client
- Go to the Clients section and click on the client name for which you want to enable the portal.
- Under Portal, click on Enable access for this client.
A unique link will be generated for this client, allowing them to join and connect with your organization. Once the client connects for the first time, their portal status will automatically change from Invited to Active.
Click on Send link by email to generate an email template that you can send to your client to invite them to join.
You can share this PDF guide with your client to help them get started with the Client Portal.
Managing mandates
When a client submits a new mandate request, an email notification will be sent, and the request will appear in the Mandates section under the Mandates to Review list. Click Review to check the information provided by the client, then choose to Accept or Decline the mandate. If the mandate is accepted, a project will be automatically created for fulfillment.
As long as the mandate request has not been approved, the client can still edit it in the Client Portal, for example to request more staff.
Once the mandate request is approved, the client can no longer modify it. If they need more staff after approval, they can submit a new request from the existing project. Once accepted in Workstaff, that new request creates a new schedule within the same project.
If the client ends up needing fewer staff, the best option is to use the internal messaging system to contact the project manager.
It is possible to enable the auto-accept mandate option for clients. When this option is enabled, all new mandate requests are automatically accepted upon creation, without requiring manager approval.
Sharing information with a client
Sharing a project
To share a project with a client that is not linked to a mandate:
- First, ensure the client is associated with the project. This can be done during the project creation process or later in the project settings.
- Next, go to the project settings, navigate to Portal, and click on Share with client.
Updating sharing options
The following sharing options are available:
- Share staff profile pictures
- Share confirmed team immediately
- Share time report
- Share publicly
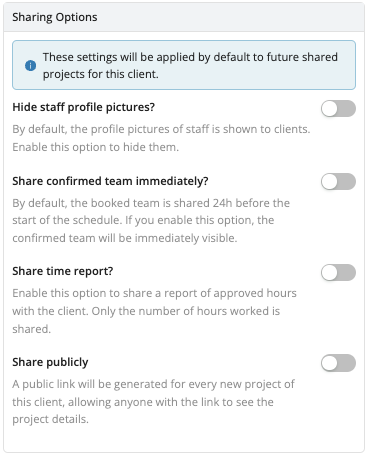
You can configure these options directly at the client level, which will apply them by default to all future shared projects for that client. Alternatively, you can adjust the sharing settings for a specific project directly from the project settings to tailor them as needed.
Managing Portal access
If you need to modify or revoke access to a portal, please contact us for assistance.